Session State: The session state is used to maintain the session of each
user throughout the application. Session allows information to be stored in one
page and access in another page and support any type of object. In many
websites we will see the functionality like once if we login into website they
will show username in all the pages for that they will store username in
session and they will access that session username in all the pages.
Whenever user enters into website new session id will
generate for that user. This session Id will delete when he leave from that
application. If he enters again he will get new session Id.
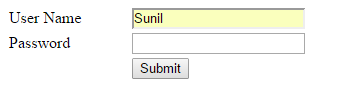
Step 1:-First open your visual studio
-->File-->New-->website-->select ASP.NET Empty website
-->OK-->open solution explorer -->Add New Web Form -->drag and drop
label,Text box and Button control on the form as shown below:-
<%@ Page
Language="C#"
AutoEventWireup="true"
CodeFile="Session_State.aspx.cs"
Inherits="Session_State"
%>
<!DOCTYPE html PUBLIC "-//W3C//DTD
XHTML 1.0 Transitional//EN" "http://www.w3.org/TR/xhtml1/DTD/xhtml1-transitional.dtd">
<html xmlns="http://www.w3.org/1999/xhtml">
<head runat="server">
<title></title>
<style type="text/css">
.style2
{
width: 119px;
}
</style>
</head>
<body>
<form id="form1" runat="server">
<div>
<table style="width:100%;">
<tr>
<td
class="style2">
User Name</td>
<td>
<asp:TextBox ID="TextBox1"
runat="server"></asp:TextBox>
</td>
</tr>
<tr>
<td
class="style2"
>
Password</td>
<td>
<asp:TextBox ID="TextBox2"
runat="server"></asp:TextBox>
</td>
<td>
</td>
</tr>
<tr>
<td
class="style2"
>
</td>
<td>
<asp:Button ID="Button1"
runat="server"
onclick="Button1_Click"
style="margin-left: 0px" Text="Submit"
/>
<br
/>
</td>
<td>
</td>
</tr>
</table>
</div>
</form>
</body>
</html>
Step 2:- Double click on Submit button
-->write the following codes which are given below:-
using System;
using System.Collections.Generic;
using System.Linq;
using System.Web;
using System.Web.UI;
using System.Web.UI.WebControls;
public partial class Session_State
: System.Web.UI.Page
{
protected void
Page_Load(object sender, EventArgs e)
{
}
protected void
Button1_Click(object sender, EventArgs e)
{
Session["user"] =
TextBox1.Text;
// Session["pass"] = TextBox2.Text;
Response.Redirect("Default2.aspx");
Session.RemoveAll();
}
}
Step 3:- No Add a New web Form -->drag
and drop label and button control on te web Form as shown below:-

Step 4:- Double click on Logout
button-->Write the following codes which are given below:-
using System;
using System.Collections.Generic;
using System.Linq;
using System.Web;
using System.Web.UI;
using System.Web.UI.WebControls;
public partial class Session_State
: System.Web.UI.Page
{
protected void
Page_Load(object sender, EventArgs e)
{
}
protected void
Button1_Click(object sender, EventArgs e)
{
Session["user"] = TextBox1.Text;
// Session["pass"] = TextBox2.Text;
Response.Redirect("Default2.aspx");
Session.RemoveAll();
}
}
Step 5:- Now Run the application
(press F5)-->Fill the required field details as shown below:-
---------------------------------------------------------------------------------------------------------------
Step 6:- Now click Submit button
--> you will see following output-->now click Logout button-->
you will redirect to home page(destroy session).

No comments:
Post a Comment