Share Blog

Wednesday, September 09, 2015

How To create Registration Form in Asp.net


--------------------------------Create a Table ------------------------------------------------------------

CREATE TABLE Employee
(
      [Empid] [int] IDENTITY(1,1) Primary Key NOT NULL,
      [Fname] [nvarchar](50) NULL,
      [Lname] [nvarchar](50) NULL,
      [Password] [nvarchar](50) NULL,
      [Email] [nvarchar](50) NULL,
      [Address] [nvarchar](150) NULL
     
)

Once we finish TABLE creation in database now open your aspx page and write the code like as shown belowAfter completion of aspx page

<%@ Page Language="C#" AutoEventWireup="true" CodeFile="Registration.aspx.cs" Inherits="Registration" %>

<!DOCTYPE html PUBLIC "-//W3C//DTD XHTML 1.0 Transitional//EN" "http://www.w3.org/TR/xhtml1/DTD/xhtml1-transitional.dtd">

<html xmlns="http://www.w3.org/1999/xhtml">
<head runat="server">
    <title>How To Create Registration Page in Asp.net</title>
    <style type="text/css">
    #div {
        width:450px;
        margin:0 auto;
        font-family:Verdana, sans-serif;
    }
    legend {
        color:#0481b1;
        font-size:16px;
        padding:0 10px;
        background:#fff;
        -moz-border-radius:4px;
        box-shadow: 0 1px 5px rgba(4, 129, 177, 0.5);
        padding:5px 10px;
        text-transform:uppercase;
        font-family:Helvetica, sans-serif;
        font-weight:bold;
    }
    fieldset {
        border-radius:4px;
        background: #fff;
        background: -moz-linear-gradient(#fff, #f9fdff);
        background: -o-linear-gradient(#fff, #f9fdff);
        background: -webkit-gradient(linear, 0% 0%, 0% 100%, from(#fff), to(#f9fdff)); /
        background: -webkit-linear-gradient(#fff, #f9fdff);
        padding:20px;
        border-color:rgba(4, 129, 177, 0.4);
    }
    input,
    textarea {
        color: #373737;
        background: #fff;
        border: 1px solid #CCCCCC;
        color: #aaa;
        font-size: 14px;
        line-height: 1.2em;
        margin-bottom:15px;

        -moz-border-radius:4px;
        -webkit-border-radius:4px;
        border-radius:4px;
        box-shadow: 0 1px 2px rgba(0, 0, 0, 0.1) inset, 0 1px 0 rgba(255, 255, 255, 0.2);
    }
    input[type="text"],
    input[type="password"]{
        padding: 8px 6px;
        height: 22px;
        width:280px;
    }
    input[type="text"]:focus,
    input[type="password"]:focus {
        background:#f5fcfe;
        text-indent: 0;
        z-index: 1;
        color: #373737;
        -webkit-transition-duration: 400ms;
        -webkit-transition-property: width, background;
        -webkit-transition-timing-function: ease;
        -moz-transition-duration: 400ms;
        -moz-transition-property: width, background;
        -moz-transition-timing-function: ease;
        -o-transition-duration: 400ms;
        -o-transition-property: width, background;
        -o-transition-timing-function: ease;
        width: 380px;
       
        border-color:#ccc;
        box-shadow:0 0 5px rgba(4, 129, 177, 0.5);
        opacity:0.6;
    }
    input[type="submit"]{
        background: #222;
        border: none;
        text-shadow: 0 -1px 0 rgba(0,0,0,0.3);
        text-transform:uppercase;
        color: #eee;
        cursor: pointer;
        font-size: 15px;
        margin: 5px 0;
        padding: 5px 22px;
        -moz-border-radius: 4px;
        border-radius: 4px;
        -webkit-border-radius:4px;
        -webkit-box-shadow: 0px 1px 2px rgba(0,0,0,0.3);
        -moz-box-shadow: 0px 1px 2px rgba(0,0,0,0.3);
        box-shadow: 0px 1px 2px rgba(0,0,0,0.3);
    }
    textarea {
        padding:3px;
        width:96%;
        height:100px;
    }
    textarea:focus {
        background:#ebf8fd;
        text-indent: 0;
        z-index: 1;
        color: #373737;
        opacity:0.6;
        box-shadow:0 0 5px rgba(4, 129, 177, 0.5);
        border-color:#ccc;
    }
    .small {
        line-height:14px;
        font-size:12px;
        color:#999898;
        margin-bottom:3px;
    }
</style>
</head>
<body>
    <form id="form1" runat="server">
    <div id="div">
        <form action="" method="post">
            <fieldset>
                <legend>Register Form</legend>
                <div>
                    <asp:TextBox ID="txtfirstname" runat="server" placeholder="First Name"></asp:TextBox>
                   
                </div>
                <div>
                    <asp:TextBox ID="txtlastname" runat="server" placeholder="Last Name"></asp:TextBox>
                  
                </div>
                <div>
                    <asp:TextBox ID="txtpassword" runat="server" placeholder="Password" TextMode="Password"></asp:TextBox>
                 
                </div>
                <div>
                    <asp:TextBox ID="txtemail" runat="server" placeholder="Email"></asp:TextBox>
                   
                </div>
                <div>
                    <asp:TextBox ID="txtaddress" runat="server" placeholder="Address" TextMode="MultiLine"></asp:TextBox>
                   
                </div>
                <asp:Button ID="Btnsubmit" runat="server" Text="Submit"
                    onclick="Btnsubmit_Click"  />
               
            </fieldset>   
        </form>
    </div>
    </form>
</body>
</html>

Add following namespaces in codebehind

using System.Data.SqlClient;
using System.Data;

After completion of adding namespaces you need to write the code like as shown below

using System;
using System.Collections.Generic;
using System.Linq;
using System.Web;
using System.Web.UI;
using System.Web.UI.WebControls;
using System.Data.SqlClient;
using System.Data;


public partial class Registration : System.Web.UI.Page
{
    SqlConnection con = new SqlConnection("Data Source=LENOVO-PC;Initial Catalog=Sunil;Integrated Security=True");
    protected void Page_Load(object sender, EventArgs e)
    {

    }
    protected void Btnsubmit_Click(object sender, EventArgs e)
    {
        con.Open();
        SqlCommand cmd = new SqlCommand("Insert into Employee values(@Fname,@Lname,@Password,@Email,@Address)",con);
        cmd.Parameters.AddWithValue("@Fname",txtfirstname.Text);
        cmd.Parameters.AddWithValue("@Lname", txtlastname.Text);
        cmd.Parameters.AddWithValue("@Password", txtpassword.Text);
        cmd.Parameters.AddWithValue("@Email", txtemail.Text);
        cmd.Parameters.AddWithValue("@Address", txtaddress.Text);
        cmd.ExecuteNonQuery();
        Response.Write("<script>alert('Registration Successful');</script>");
        con.Close();
    }
}


Tuesday, September 08, 2015

How to Draw Images on Canvas in HTML 5

Introduction:
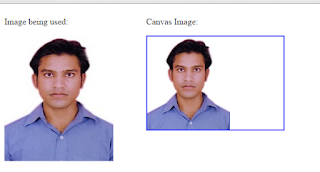
Let’s have some knowledge of the canvas images by understanding its function for drawing the images. To draw a canvas image, the drawImage() method is used that requires an images object and a destination point. The destination point means the top-left corner of the images relative to the top-left corner of the canvas on which the image is to be drawn.
There are the following three variants of this method.
v  drawImage(image, dx, dy).
v  drawImage(image, dx, dy, dw, dh)
v  drawImage(image, sx, sy, sw, sh, dx, dy, dw, dh,).


First we should know about all the parameters given in the methods, so we can understand the use of all the parameters and can easily play with the images.

The parameter "images" is the image that is to be drawn.

The parameters "dx" and "dy" are known as "destinationX" and "destinationY" respectively and determine where the image is to be drawn on the canvas.

The parameters "dw" and "dh" are known as "destinationWidth" and "destinationHeight" respectively and determine the scale size of the image.

The parameters "sx" and "sy" are known as "sourceX" and "sourceY" respectively and determine the where in the source images to start copying the rectangle of the images onto the canvas.

The parameters "sw" and "sh" are known as "sourceWidth" and "sourceHeight" respectively and determine the scaling (extent of copying of width and height) of the source image.

As we all know, the drawImage() method needs an object, so first we should create an image object and should wait for it to load by applying the 
 window.onload() function before the initiation ofthe drawImages() method.


<%@ Page Language="C#" AutoEventWireup="true" CodeFile="HTML5_CANVAS.aspx.cs" Inherits="HTML5_CANVAS" %>

<!DOCTYPE html PUBLIC "-//W3C//DTD XHTML 1.0 Transitional//EN" "http://www.w3.org/TR/xhtml1/DTD/xhtml1-transitional.dtd">

<html xmlns="http://www.w3.org/1999/xhtml">
<head runat="server">
    <title></title>
</head>
<body>
    <form id="form1" runat="server">
    <div style="float: left;">
        <p>Image being used:</p>
        <img id="sunil" width="200" height="230" src="Images/sunil.jpg" alt="blank">
    </div>
    <div style="float: left;margin-left:60px;">
        <p>Canvas Image:</p>
        <canvas id="smokeCanvas" width="250" height="170" style="border: 2px solid blue;">
            <script>
                window.onload = function ashSkull() {
                    var newCanvas = document.getElementById("smokeCanvas");
                    var context = newCanvas.getContext("2d");
                    var image = document.getElementById("sunil");
                    context.drawImage(image, 0, 0);
                }
            </script>
        </canvas>
    </div>
    </form>
</body>
</html>


Output


Monday, September 07, 2015

Differentiate between an abstract class and an interface.

Abstract Class:
A class can extend only one abstract class
The members of abstract class can be private as well as protected.
Abstract classes should have subclasses
Any class can extend an abstract class.
Methods in abstract class can be abstract as well as concrete.
There can be a constructor for abstract class.
The class extending the abstract class may or may not implement any of its method.
An abstract class can implement methods.

Interface
A class can implement several interfaces
An interface can only have public members.
Interfaces must have implementations by classes
Only an interface can extend another interface.
All methods in an interface should be abstract
Interface does not have constructor.
All methods of interface need to be implemented by a class implementing that interface.
Interfaces cannot contain body of any of its method.


Friday, August 28, 2015

Page Life Cycle in Asp.net

1.PreInit
2.Init
3.InitComplete
4.Preload
5.Load
6.Control Events
7.Load Complete
8.PreRender
9.PreRenderComplete
10.SaveStateComplete
11.Render

12.Unload


The first stage in the page life cycle is initialization. This is fired after the page's control tree has been successfully created. All the controls that are statically declared in the .aspx file will be initialized with the default values. Controls can use this event to initialize some of the settings that can be used throughout the lifetime of the incoming web request.

After initialization, page framework loads the view state for the page. Viewstate is a collection of name/value pairs, where control's and page itself store information that is persistent among web requests. It contains the state of the controls the last time the page was processed on the server. By overriding LoadViewState() method, component developer can understand how Viewstate is restored.

Once Viewstate is restored, control will be updated with the client side changes. It loads the posted data values. The PostBackData event gives control a chance to update their state that reflects the state of the HTML element on the client.

At the end of the posted data changes event, controls will be reflected with changes done on the client. At this point, load event is fired.

Key event in the life cycle is when the server-side code associated with an event triggered on the client. When the user clicks on the button, the page posts back. Page framework calls the RaisePostBackEvent. This event looks up for the event handler and run the associated delegate.

After Postback event, page prepares for rendering. PreRender event is called. This is the place where user can do the update operations before the Viewstate is stored and output is rendered. Next stage is saving view state, all the values of the controls will be saved to their own Viewstate collection. The resultant Viewstate is serialized, hashed, base24 encoded and associated with the _Viewstate hidden field.

Next the render method is called. This method takes the HtmlWriter object and uses it to accumulate all HTML text to be generated for the control. For each control the page calls the render method and caches the HTML output. The rendering mechanism for the control can be altered by overriding this render method.

The final stage of the life cycle is unload event. This is called just before the page object is dismissed. In this event, you can release critical resources you have such as database connections, files, graphical objects etc. After this event browser receives the HTTP response packet and displays the page.

Friday, August 21, 2015

Keyboard Shortcut key For Visual Studio 2008,2012,2010

General Shortcut Keys
ShortCut
Description
Ctrl-X or Shift-Delete or Ctrl-L
Cuts the currently selected item to the clipboard
Ctrl-Del
Delete next "word"
Ctrl-C or Ctrl-Insert
Copies the currently selected item to the clipboard
Ctrl-V or Shift-Insert
Pastes the item from the clipboard at the cursor location
Ctrl-Z or Alt-Backspace
Undo the previous editing action
Ctrl-Space
To see intelligence dialog
Ctrl-Y or Ctrl-Shift-Z
Redo the previous undo action
Ctrl-S
Saves the current selected file
Ctrl-Shift-S
Saves all files and projects
Ctrl-P
Displays the Print dialog
F7
Switches from the design view to the code view in the editor
Shift-F7
Switches from the code view to the design view in the editor
Shift-F8 or F8
Navigate to compile time errors
Alt-Shift-A
Add Existing Item(file) to selected project
Ctrl-Shift-A
Add New Item(file) to selected project
Shift-F9
Display the selected item quick output means contains value while debugging
F12
Moves the cursor to the selected method, variable, class definition.
Shift-F12
Finds the reference to the selected method, variable, class or the item under the cursor
Ctrl-}
Match curly braces, brackets or compiler directives
Ctrl-Shift-}
Select text between matched braces, brackets or compiler directives


Text Navigation Shortcut Keys
ShortCut
Description
Ctrl-End
Moves the cursor to the end of the document
Ctrl-Home
Moves the cursor to the start of the document
Ctrl-G
Displays the Go to Line dialog. If the debugger is running, the dialog also lets you specify addresses or function names to go to
Ctrl-]
Moves the cursor to the matching brace in the document. If the cursor is on an opening brace, this will move to the corresponding closing brace and vice versa
Ctrl-K, Ctrl-N
Moves to the next bookmark in the document
Ctrl-K, Ctrl-P
Moves to the previous bookmark
Ctrl-K, Ctrl-I
Displays Quick Info, based on the current language
Ctrl-Down Arrow
Scrolls text down one line but does not move the cursor. This is useful for scrolling more text into view without losing your place. Available only in text editors
Ctrl-Up Arrow
Scrolls text up one line but does not move the cursor. Available only in text editors
Ctrl-Right Arrow
Moves the cursor one word to the right
Ctrl-Left Arrow
Moves the cursor one word to the left
Ctrl-Shift-1
Navigates to the next definition, declaration, or reference of an item. Available in the object browser and Class View window. Also available in source editing windows if you have already used the Edit.GoToReference (Shift-F12) shortcut
Ctrl-Shift-2
Navigates to the previous definition, declaration, or reference of an item


Text Manipulation Shortcut Keys
ShortCut
Description
Shift-Tab
Moves current line or selected lines one tab stop to the left
Backspace or
Deletes one character to the left of the cursor
Shift-Backspace
Ctrl-G
Go to Particular line
Ctrl-K, Ctrl-C
Marks the current line or selected lines of code as a comment, using the correct comment syntax for the programming language
Ctrl-K, Ctrl-U
Removes the comment syntax from the current line or currently selected lines of code
Ctrl-T or
Swaps the characters on either side of the cursor. (For example, AC|BD becomes AB|CD.) Available only in text editors
Shift-Enter
Ctrl-K, Ctrl-L
Removes all unnamed bookmarks in the current document
Ctrl-M, Ctrl-O
Automatically determines logical boundaries for creating regions in code, such as procedures, and then hides them. This collapses all such regions in the current document
Alt-Right Arrow or
Displays statement completion based on the current language or autocompletes word if existing text unambiguously identifies a single symbol
Ctrl-Spacebar
Ctrl-K, Ctrl-\
Removes horizontal whitespace in the selection or deletes whitespace adjacent to the cursor if there is no selection
Ctrl-K, Ctrl-F
Applies the indenting and space formatting for the language as specified on the Formatting pane of the language in the Text Editor section of the Options dialog to the selected text.
Ctrl-L
Cuts all selected lines or the current line if nothing has been selected to the clipboard
Ctrl-Shift-L
Deletes all selected lines or the current line if no selection has been made
Ctrl-Enter
Inserts a blank line above the cursor
Ctrl-Shift-Enter
Inserts a blank line below the cursor
Shift-Alt-T
Moves the line containing the cursor below the next line
Ctrl-J
Lists members for statement completion when editing code
Ctrl-U
Changes the selected text to lowercase characters
Ctrl-Shift-U
Changes the selected text to uppercase characters
Ctrl-Shift-Spacebar
Displays a tooltip that contains information for the current parameter, based on the current language
Ctrl-M, Ctrl-U
Removes the outlining information for the currently selected region
Ctrl-M, Ctrl-P
Removes all outlining information from the entire document
Ctrl-R, Ctrl-P
Swaps the anchor and endpoint of the current selection
Ctrl-M, Ctrl-L
Toggles all previously marked hidden text sections between hidden and display states
Ctrl-K, Ctrl-K
Sets or removes a bookmark at the current line
Ctrl-M, Ctrl-M
Toggles the currently selected hidden text section or the section containing the cursor if there is no selection between the hidden and display states
Ctrl-K, Ctrl-H
Sets or removes a shortcut in the tasklist to the current line
Ctrl-R, Ctrl-R
Enables or disables word wrap in an editor
Ctrl-R, Ctrl-W
Shows or hides spaces and tab marks
Ctrl-Delete
Deletes the word to the right of the cursor
Ctrl-Backspace
Deletes the word to the left of the cursor
Ctrl-Shift-T
Transposes the two words that follow the cursor. (For example, |End Sub would be changed to read Sub End|.)


Project Related Shortcut Keys
ShortCut
Description
Ctrl-Shift-B
Builds the solution
Ctrl-N
Displays the New File dialog. Note: files created this way are not associated with a project. Use Ctrl-Shift-A to add a new file in a project
Ctrl-Shift-N
Displays the New Project dialog
Ctrl-O
Displays the Open File dialog
Ctrl-Shift-O
Displays the Open Project dialog
Shift-Alt-A
Displays the Add Existing Item dialog
Ctrl-Shift-A
Displays the Add New Item dialog
Ctrl-Alt-Insert
Allows you to override base class methods in a derived class when an overridable method is highlighted in the Class View pane
Ctrl-M-O
Collapse all the methods, classes, regions in the current code behind or class file
Ctrl-M-P or Ctrl-M-L
Expands all the methods, classes, regions in the current code behind or class file
Ctrl-F
Displays the Find dialog
Ctrl-H
Displays the Replace dialog
Ctrl-Shift-F
Find the reference of selected item into entire solution.
Ctrl-Tab
Move from one opened file to another opened file in visual studio.
F9
Sets or removes a breakpoint at the current line
Ctrl-F9
Enables or disables the breakpoint on the current line of code. The line must already have a breakpoint for this to work
F5
Runs the code with invoking the debugger.
Ctrl-F5
Runs the code without invoking the debugger.
F4 or Alt-Enter
Displays the Properties window, which lists the design-time properties and events for the currently selected item
Ctrl-Alt-S
Displays the Server Explorer window, which allows you to view and manipulate database servers, event logs, message queues, web services, and   many other operating system services
Ctrl-Alt-L
Displays the Solution Explorer, which lists the projects and files in the current solution
Ctrl-Alt-X
Displays the Toolbox, which contains controls and other items that can be dragged into editor and designer windows
Ctrl-Alt-I
Displays the Immediate window, where you can find the controls or variables values or can do data manipulation during debugging